I've recently become interested in unikernels, particularly in combination with Rust.
Unikernels are single-purpose, bootable images that run your application. Instead of making syscalls into the kernel to interact with hardware, the kernel syscalls are compiled directly into your application. The kernel code essentially becomes a library used by your application, rather than a separate layer that your application talks to. Most unikernels target a hypervisor like Xen, but some can also run on bare metal.
At least, that's my understanding so far. :)
For an excellent introduction to unikernels, I would recommend reading Unikernels: Rise of the Virtual Library Operating System. The article focuses on MirageOs, but the principles apply to the entire family of unikernels.1
While there is undoubtedly a certain amount of “What's old is new again”, unikernels seem compelling for select use-cases. If you'd like to read more, I've compiled a short list of other articles that I've found interesting.2
Unikernels in Rust
After learning about unikernels, my first reaction was “Let's build one in Rust!". Luckily for me, someone has already done all the hard work:
Huge props to the author, Gandro, for making this whole thing available to the Rust community. It is fantastic!
This process utilizes NetBSD's rump kernel components to construct the unikernel. Because these components are POSIX-compliant you can run (most?) Rust code with no modification. Which is pretty cool!
The setup is straightforward, although it does take a while. First you build
the Rumprun framework, then build a custom rustc that can cross-compile to the
target platform. Finally, you cross-compile your code and “bake” it into a unikernel.
A fair word of warning: I was unable to get the build process to work on my Mac.
There are directions to build the toolset natively…and I simply could not get
these to work. There are also docker images which you can use, but I found the setup
to be clunky (just personal taste).
Update 11/19/2015: With the help of the rump crew on IRC, I sorted out the build issue on Mac OSX. I had a problem with libcloog depending on an old version of libisl, which was not compatible with the newer gcc. This was the error:
$ x86_64--netbsd-gcc test.c
dyld: Library not loaded: /usr/local/lib/libisl.10.dylib
 Referenced from: /usr/local/lib/libcloog-isl.4.dylib
 Reason: image not found
x86_64--netbsd-gcc: internal compiler error: Trace/BPT trap: 5 (program cc1)
libbacktrace could not find executable to open
Please submit a full bug report,
with preprocessed source if appropriate.
See <http://www.NetBSD.org/Misc/send-pr.html> for instructions.
Which I eventually resolved by uninstalling and reinstalling cloog in homebrew:
brew rm cloog
brew install cloog
So now I have rump setup on both my mac and linux laptops. \o/
Adding storage to a Unikernel
After running through the demo hello and hello-tcp examples, the first thing
I wanted to do was write some files. While it ended up being simple, as someone
new to Rump and qemu, it took some digging to figure out. Perhaps this article
will save someone else some effort.
To add storage to our emulated machine, we first need to create a disk image:
$ dd if=/dev/zero of=hdd.img bs=4k 60000
$ mkfs.ext3 hdd.img
$ tune2fs -c0 -i0 hdd.img
That will create a 240mb image filled with zeros and format it as an ext3 file system.3
The tune2fs command disables automatic checking by e2fsck (-c disables triggering on
count, while -i disables triggering by time). I really don't think this was necessary…
but I found it in a guide and who am I to argue?
That's it! You can now use that image as a drive in qemu, or mount it in the host system to access the data.
Compiling a simple demo
To test the drive image, I wrote a quick demo:
use std::io::prelude::*;
use std::io::{BufReader, BufWriter};
use std::fs::File;

fn main() {
    match File::open("/data/foo.txt") {
        Ok(f) => {
            let mut reader = BufReader::new(f);
            let mut buffer = String::new();

            reader.read_line(&mut buffer).unwrap();
            println!("{}", buffer);
        },
        Err(e) => println!("ERROR: {}", e)
    }

    match File::create("/data/foo.txt") {
        Ok(file) => {
            let mut writer = BufWriter::new(file);

            writer.write(b"This is a test").unwrap();
            println!("Finished write.");
        },
        Err(e) => println!("ERROR: {}", e)
    }
}
Dead simple. First it tries to open /data/foo.txt: if it exists, read and
print the contents to screen. Otherwise display an error. Next it tries to write
to the same file, and either display a success message or an error.
To run this as a unikernel, we first cross-compile into a unikernel image:
$ cargo rumpbake hw_virtio
What's that hw_virtio? That's the “target” we want to compile for.
So in this case, we are compiling for hardware with virtio drivers. As someone new
to this all, I had to look up what virtio is:
Virtio is a virtualization standard for network and disk device drivers where just the guest's device driver “knows” it is running in a virtual environment, and cooperates with the hypervisor. This enables guests to get high performance network and disk operations, and gives most of the performance benefits of paravirtualization. – From LibVirt Documentation
We can see what other targets are available by running rumprun-bake list:
$ rumprun-bake list

!!!
!!! NOTE: rumprun-bake is experimental. syntax may change in the future
!!!

xen_pv          : Xen with paravirtualized I/O drivers
xen_pci         : Xen with paravirtualized and PCI I/O drivers
hw_virtio       : virtio targets (e.g. QEMU/KVM)
hw_virtio_scsi  : virtio targets with SCSI (e.g. QEMU/KVM)
hw_generic      : generic targets, includes (almost) all drivers
So, for example, you could compile for a Xen platform by using cargo rumpbake xen_pv, etc.
The cargo command both cross-compiles with rustc and “bakes” the executable
into a single image using rumprun-bake, so the end product is a single popcorn.img
in our directory.
The final image is just a hair over 20mb. This contains all the code needed to boot the image, read/write files and print to stdout. Pretty neat! I was curious what Rump kernels were being linked in (output truncated a bit for brevity):
$ rustc -Z print-link-args --target=x86_64-rumprun-netbsd src/main.rs

"x86_64-rumprun-netbsd-gcc" "-Wl,--as-needed" "-m64"
 "-L" "lib/rustlib/x86_64-rumprun-netbsd/lib"
 "main.0.o" "-o" "main" "-Wl,--gc-sections"
 "lib/rustlib/x86_64-rumprun-netbsd/lib/libstd-bb943c5a.rlib"
 "lib/rustlib/x86_64-rumprun-netbsd/lib/libcollections-bb943c5a.rlib"
 "lib/rustlib/x86_64-rumprun-netbsd/lib/librustc_unicode-bb943c5a.rlib"
 "lib/rustlib/x86_64-rumprun-netbsd/lib/librand-bb943c5a.rlib"
 "lib/rustlib/x86_64-rumprun-netbsd/lib/liballoc-bb943c5a.rlib"
 "lib/rustlib/x86_64-rumprun-netbsd/lib/liballoc_system-bb943c5a.rlib"
 "lib/rustlib/x86_64-rumprun-netbsd/lib/liblibc-bb943c5a.rlib"
 "lib/rustlib/x86_64-rumprun-netbsd/lib/libcore-bb943c5a.rlib"
 "-L" "lib/rustlib/x86_64-rumprun-netbsd/lib"
 "-L" "/home/zach/rust/popcorn/.rust/lib/x86_64-rumprun-netbsd"
 "-L" "/home/zach/rust/popcorn/lib/x86_64-rumprun-netbsd"
 "-Wl,-Bstatic" "-Wl,-Bdynamic" "-l" "pthread" "-l" "unwind" "-l" "compiler-rt"
So we can see that our small app is pulling in the standard library, collections, unicode, rand, alloc, libc, and libcore.
Booting the unikernel
Now that the unikernel has been baked, we need to run it via rumprun, a convenience
tool provided by Rump to run a variety of platforms/virtualizations. We'll use the
qemu target, and -b to specify the hard drive image (in the format “path,mount-location”).
Let's see what it does first by using the -D parameter – this will print the command
instead of executing it
$ rumprun -D qemu -i -b hdd.img,/data popcorn.img

qemu-system-x86_64 -net none -no-kvm -drive if=virtio,file=/home/zach/rust/hdd.img -m 64 -kernel popcorn.img -append  {,,
	"blk" :  {,,
		"source":	"dev",,
		"path":	"/dev/ld0a",,
		"fstype":	"blk",,
		"mountpoint":	"/data",,
	},,
	"cmdline": "popcorn.img",,
},,
You can see that rumprun is executing qemu with a virtio block device (/dev/ld0a) mounted
at /data, 64mb of memory, no networking and booting from our image. Let's actually execute the
command and see what happens:
$ rumprun qemu -i -b hdd.img,/data popcorn.img
This will pop up a qemu window showing the boot sequence:
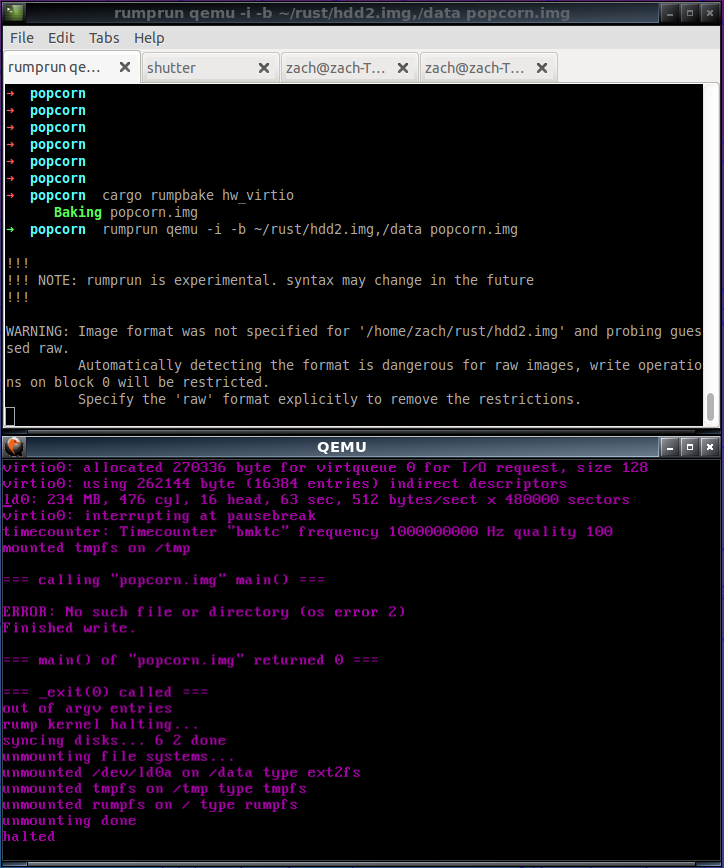
If you inspect the output in the emulator, you'll our application executing:
=== calling "popcorn.img" main() ===

ERROR: No such file or directory (os error2)
Finished write.

=== main() of "popcorn.img" returned 0 ===
Perfect! This is exactly what you would expect from our code. It first tries
to read /data/foo.txt, but fails because that file doesn't exist. It then
performs a write and prints a success message.
If we run the exact same command a second time, we'll see:

=== calling "popcorn.img" main() ===

This is a test
Finished write.

=== main() of "popcorn.img" returned 0 ===
That demonstrates that on the second run, the unikernel found /data/foo.txt
and successfully read the data into memory. Huzzah!
Mounting on the host system
It's convenient to be able to manipulate hard drive image on our host machine, so we can inspect the output of our unikernel or to setup some kind of directory architecture in advance.
To do so, we mount the image as a “loop” block device:
$ sudo mkdir /media/hdd
$ sudo mount -o loop hdd.img /media/hdd/
We can then manipulate the image as if it were a file system:
$ cat /media/hdd/foo.txt

This is a test
And when you're done, unmount it so it is accessible for qemu:
$ sudo umount /media/hdd
Conclusion
That's all for now. A mostly non-Rust article, but I spent the better part of the day trying to get a read/writable file system working with qemu. I figured someone else may run into the same difficulties and might appreciate some extra help :)
In the future I plan to start experimenting more with unikernels and Rust…hopefully with something more complicated than writing to a file.
-
The most well known unikernels being MirageOs, OSv, ClickOS, HalVM, LING and Rump Kernels↩
-
Additional reading on unikernels
- A Discussion of The Operational Challenges With Unikernels (and associated email chain on MirageOS group)
- Some Security Implication of Unikernels
- Unikernels: Library Operating Systems for the Cloud (summary of ACM paper linked earlier)
- The Next Generation Cloud: The Rise of the Unikernel
- My First Unikernel
- Deploy a Dropwizard Unikernel to AWS
- Runtime.js – JavaScript library OS
- Look ma, no OS! Unikernels and their applications
- After Docker: Unikernels and Immutable Infrastructure
-
I was unable to get
ext4to work, the kernel could never mount the drive. I'm unsure ifext4is incompatible with qemu, or if I was simply doing it wrong.↩