The Venerable ESP8266
I have a drawer of random electronics parts and failed dreams. Amongst this pile is a handful ESP8266 chips. These devices are intended to be used as low-cost WiFi modules which are operated by other microprocessors, and by default you can communicate with them over UART with a variety of commands (join a network, send a packet, etc). The idea is that you solder one of these onto your project and voila! you now have connectivity in your project.
On their own, they are pretty neat. They are super cheap (~$2 on Aliexpress) and super simple to use (UART). But the real key is that you can re-flash these devices to run your own code. So instead of a “dumb” WiFi module that's controlled by another microcontroller, you get a microcontroller that has WiFi built in, with access to all the GPIOs, I2C, SPI and ADC.
The ESP8266 really took the hobby/hacker/maker crowd by storm, largely due to it's low price point. There is now a large community around the ESP8266, building all kinds of little IoT-style projects. It's no Xeon, but the specs are pretty decent for two bucks:
- Tensilica Xtensa LX106 running at 80 MHz (and apparently overclockable to 160Mhz)
- 64KB of instruction RAM, 96 KB of data RAM (~40KB usable to the user)
- Anywhere between 512KB and 4MB of flash, depending on the model.
- 16 GPIO, 1xUART, I2C, SPI, 10-bit ADC
Despite all that, I've never really played with them. They can be programmed in a variety of languages: C (obviously), micropython and lua being the most common. I really wanted to use Rust, but LLVM doesn't support these Xtensa CPUs. So my ESP8266 have lain dormant while other hobby projects took up my attention
RTL8710
I recently discovered a small WiFi module called the RTL8710, made by Realtek. It's positioned as a competitor to the venerable ESP8266. Like the ESP8266, it is a serial-capable microprocessor that provides a full 802.11 and TCP/IP stack, packed into a tiny board and priced at just a few dollars. Again, shipped from China.
The specs are pretty similar:
- ARM Cortex M3 running at 83 MHz
- 512KB RAM (~48KB usable to the user)
- 1MB Flash
- 19 GPIO, 2xUART, I2C, SPI, 4xPWM
So you gain a bit of usable RAM with the current SDK, a few more GPIO/UART, and four real hardware PWM pins. But you lose some clock speed, likely some Flash compared to modern ESP8266 variants, and an ADC (which is a shame, I would have liked an onboard ADC).
But the real benefit in my opinion? That ARM Cortex-M3. That means standardized tooling and debugging. And it means Rust, since LLVM supports ARM. Woo!
Getting a RTL8710
First up, you'll need some hardware. You can find RTL8710's on Aliexpress for $2-4. I opted to get mine from Pine64, which are rebranded as the “PADI IoT Stamp”. The price was the same ($2) but they also sold the breadboard adapter, a USB-to-Serial adapater and a SWD debugger. I needed all of those so figured I might as well save on shipping and get it all from one store. They also have some (very rudimentary) resources like a Getting Started guide, a basic data sheet and the Ameba SDK which is floating around.
I played around with the basic serial commands for a bit, and they work fine. You can read more about using the serial commands via this tutorial at CNX (also, the AT command reference docs)
Rust on RTL8710
It took a bit more work, but wasn't too hard to get Rust running on the RTL8710. You can checkout the fruits of my labor at the Rustl8710 repo.
Obligatory disclaimer: I largely have no idea what I'm doing when it comes to microcontrollers or embedded hardware. So if there are any inaccuracies, please let me know so I can correct it!
First, let's install some dependencies. I'm working on Ubuntu Linux, so you're out of luck if you're on a different platform. I tried on my Mac, but getting the SDK to work was troublesome so I just relented and used Linux.
We'll need some build tools (you'll likely have these already installed), and the ARM compiler:
$ sudo apt-get update
$ sudo apt-get install build-essential gawk bc libc6-dev:i386 lib32ncurses5-dev
$ sudo apt-get install gcc-arm-none-eabi gdb-arm-none-eabi
$ sudo apt-get install cutecom
Note: I'm using cutecom for serial communication because I'm a heathen and don't like minicom
You'll also need to download JLink or OpenOCD, depending on how you want to flash the chip. The SWD debugger from Pine64 is a JLink debugger, so install the JLink software from here: https://www.segger.com/downloads/jlink.
Clone the Rustl8710 repo so you have it ready to go:
$ git clone https://github.com/polyfractal/rustl8710
We'll also need Xargo to do our cross-compiling. If you don't already have it installed, update your nightly, install xargo, and potentially install rust-src if xargo complains:
$ cd rustl8710
$ rustup update
$ rustup override set nightly
$ rustup component add rust-src
$ cargo install xargo
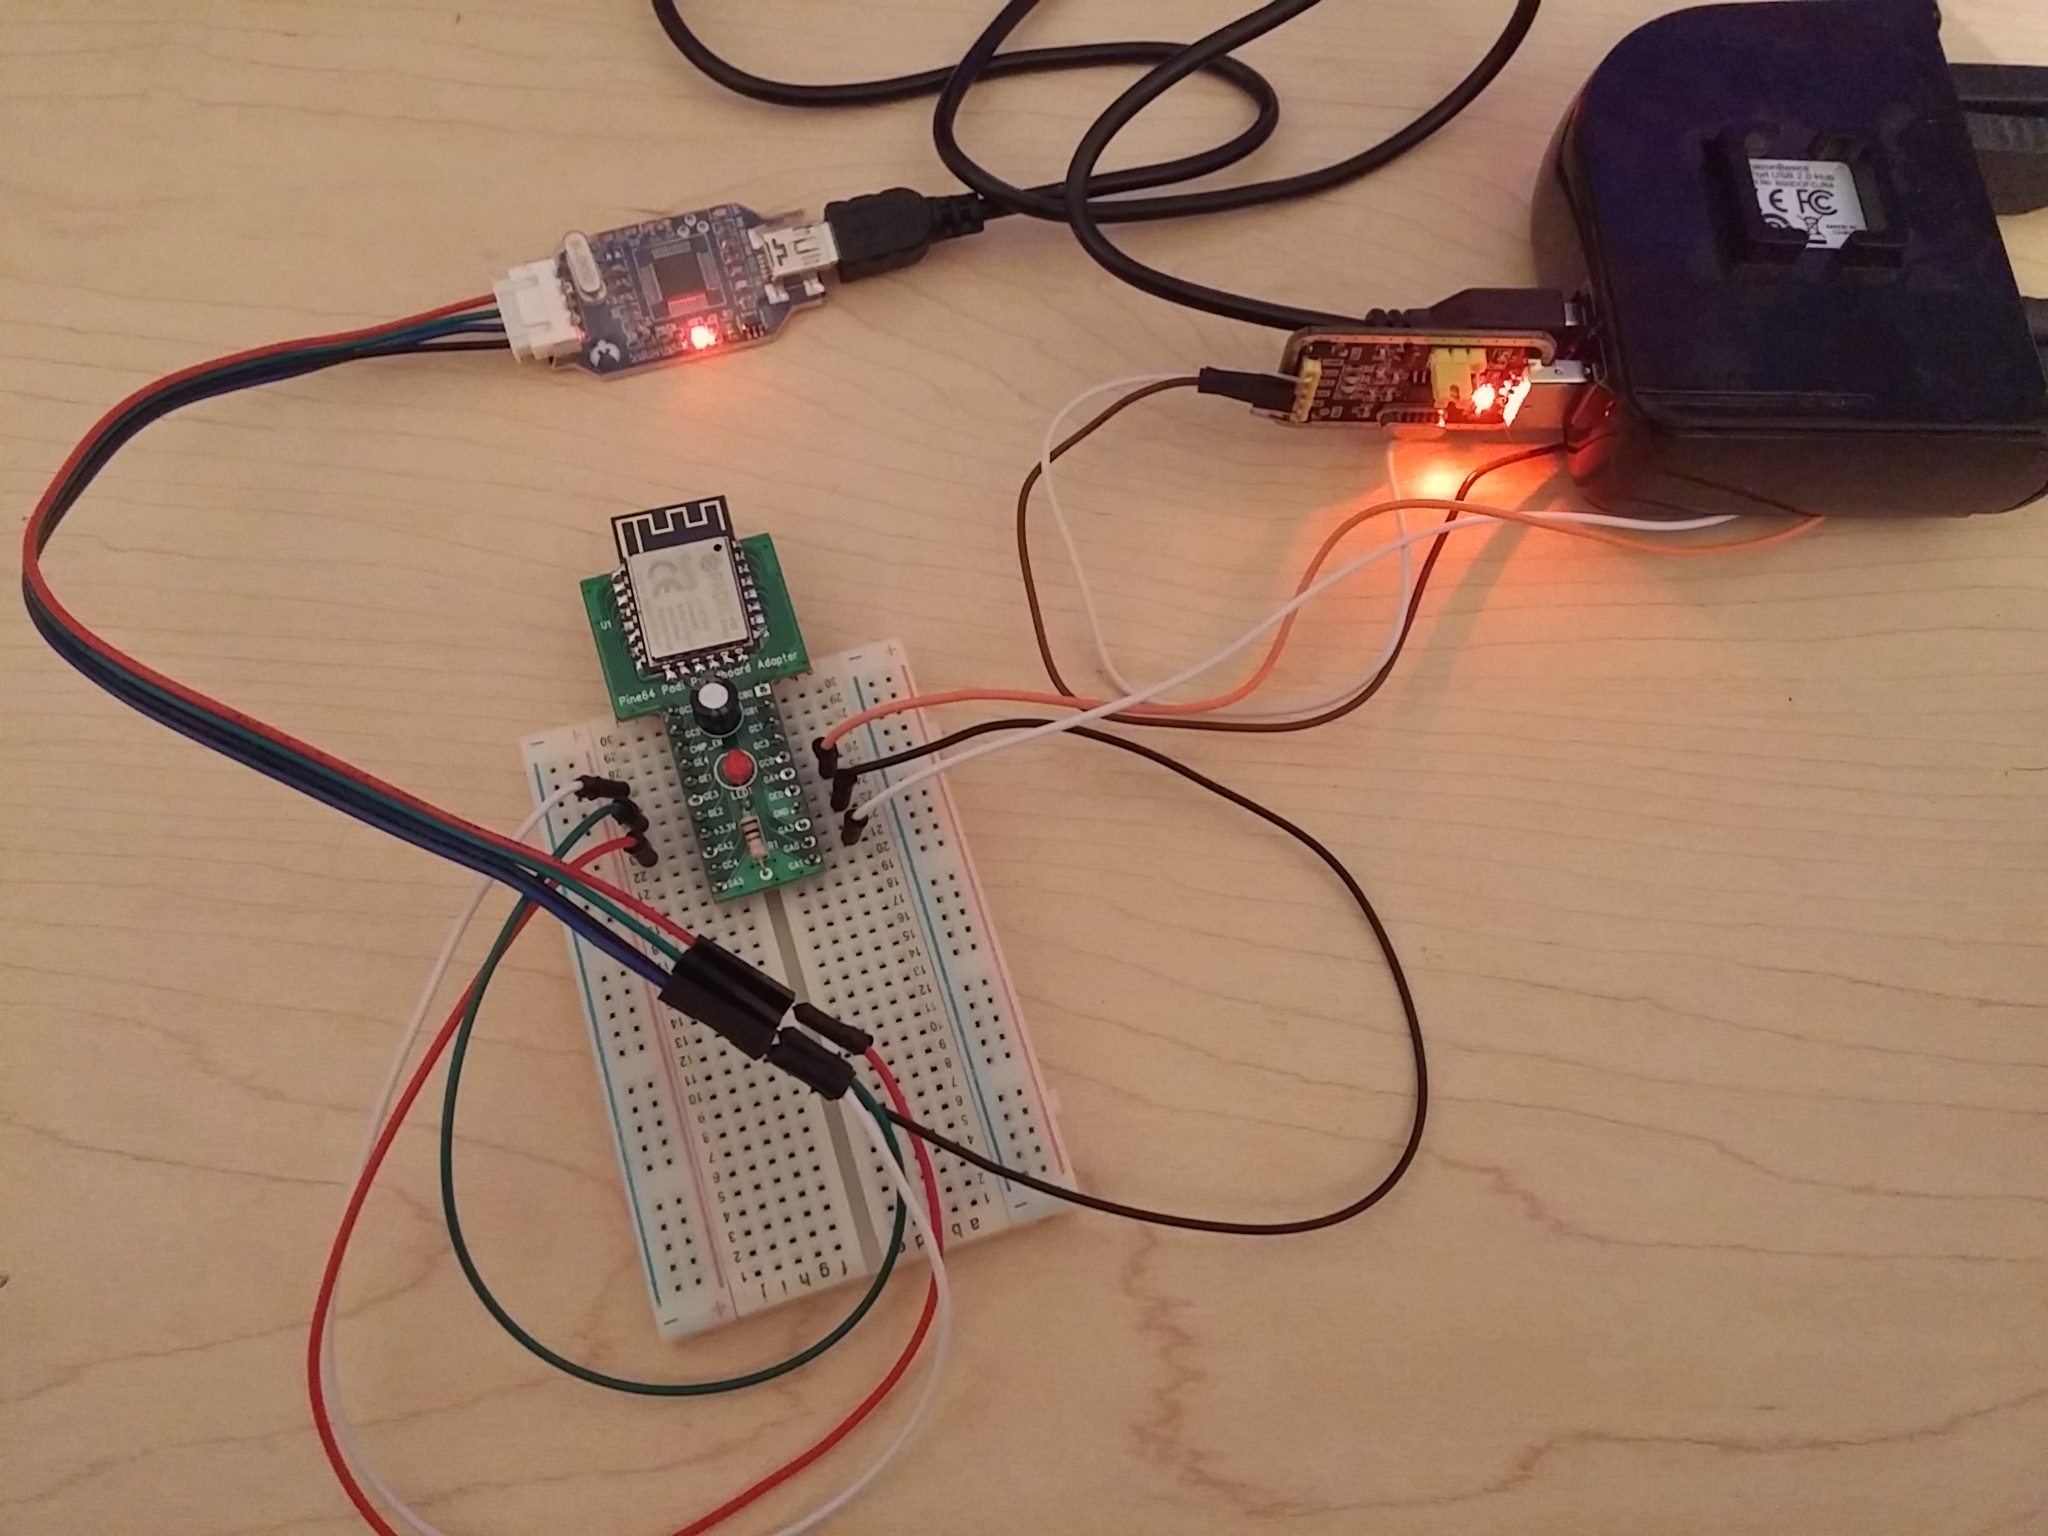
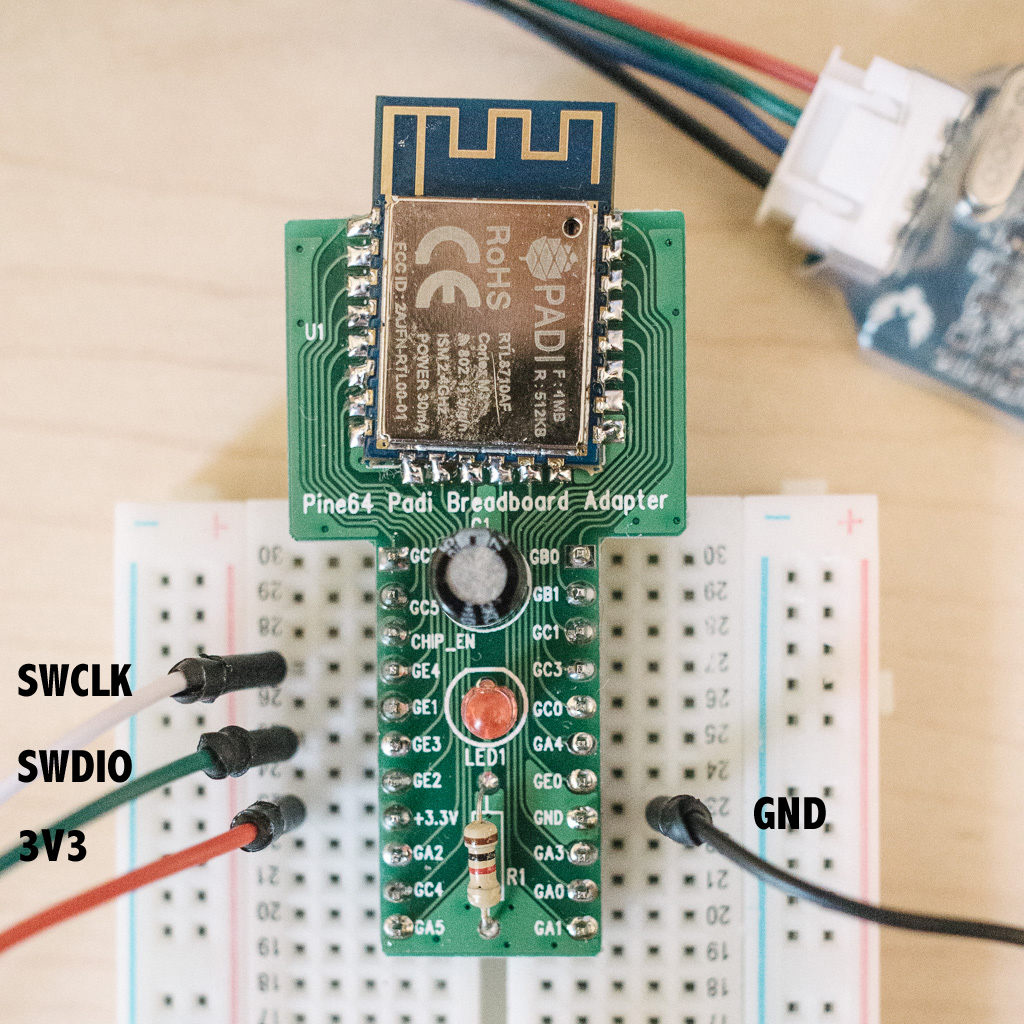
Finally, we need to connect the SWD debugger. This will be used to re-flash the RTL8710 with our code. Here is the pin diagram that you'll need to use:

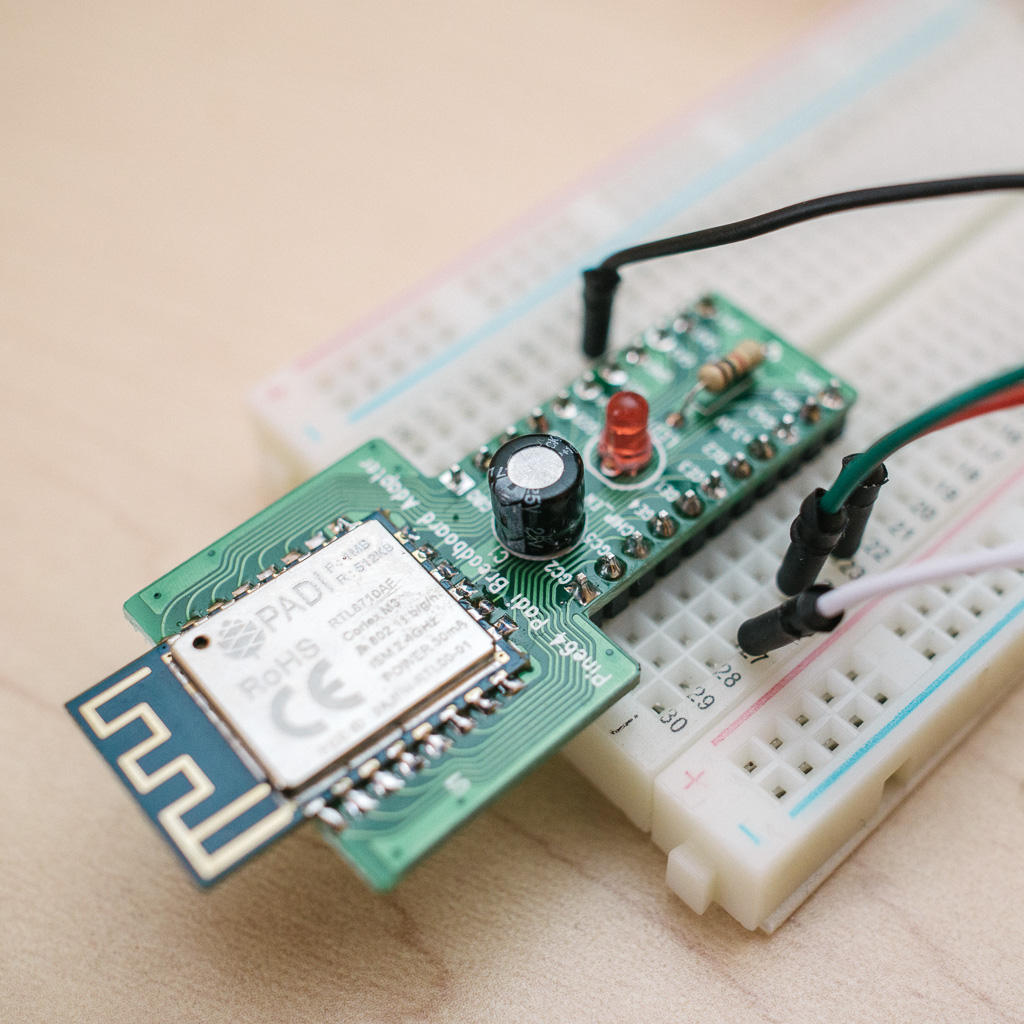
And physically wired up (yes, I know the chip is soldered askew. I'm terrible at soldering, deal with it):
Be careful, I'm a bad person and used a different-colored jumper to connect to the debugger, so the blue wire (SWCLK) becomes white.
- SWCLK (Blue) -> GE4
- SWDIO (Green) -> GE3
- 3V3 (Red) -> +3.3V
- GND (Black) -> GND
Flashing the RTL8710
Ok, all the setup is complete. CD into the Rustl8710 repo and mash make:
$ make
This will spew out a lot of info. First it will build the Rust portion of the project, which is essentially a small main loop that watches for UART input. Next it builds the C portion, which is a combination of FreeRTOS and mbed middleware. During this stage, our Rust library is linked in.
When that's done, you should (hopefully) see something like this:
...
size = 281136
checksum 1bc032e
rm application/Debug/bin/ram_*.p.bin application/Debug/bin/ram_*.ns.bin
make[1]: Leaving directory '/home/polyfractal/projects/rust/rtl'
The original build code had a lot of hardcoded paths, which I theoretically fixed when I rearranged everything. But if it breaks on your machine, it's likely because I didn't quite fix all the links. Sorry! :)
With that built, we'll have a ram_all.bin file in application/Debug/bin; this is
our final image that we'll flash.
Next, open a new terminal tab and spin up the GDB JLink server thinger:
$ /opt/SEGGER/JLink/JLinkGDBServer -device cortex-m3 -if swd
This will startup, then sit there waiting for commands from our flashing script. Go back to our original terminal tab and type:
$ make flash
If everything works, you'll see a bunch of output about setting breakpoints and restoring binary files into memory. In the JLinkGDBServer tab, you'll also see a bunch of output about reading/writing bytes. I have no idea how any of this works, so pray it works because otherwise I'm clueless to help :)
Once it's done, the make script will exit and the GDBServer will report the TCP/IP connection has closed.
Hooray! You flashed your RTL8710!
Talking to it
Disconnect power: the 3V3 pin from the debugger, which is powering the RTL8710. Then wire up the USB-to-Serial adapter. The adapter has two pins for power (3V3 and GND) which you can leave un-connected… we'll keep using the debugger for power. Connect the TX wire to GA4, and the RX wire to GA0:

- TX (White) -> GA4
- RX (Orange) -> GA0
Open up cutecom (or minicom or whatever you want to use):
$ sudo cutecom
And set the details to:
- Device: /dev/ttyUSB0
- Baud rate: 38400
- Data bits: 8
- Stop bits: 1
- Parity: none
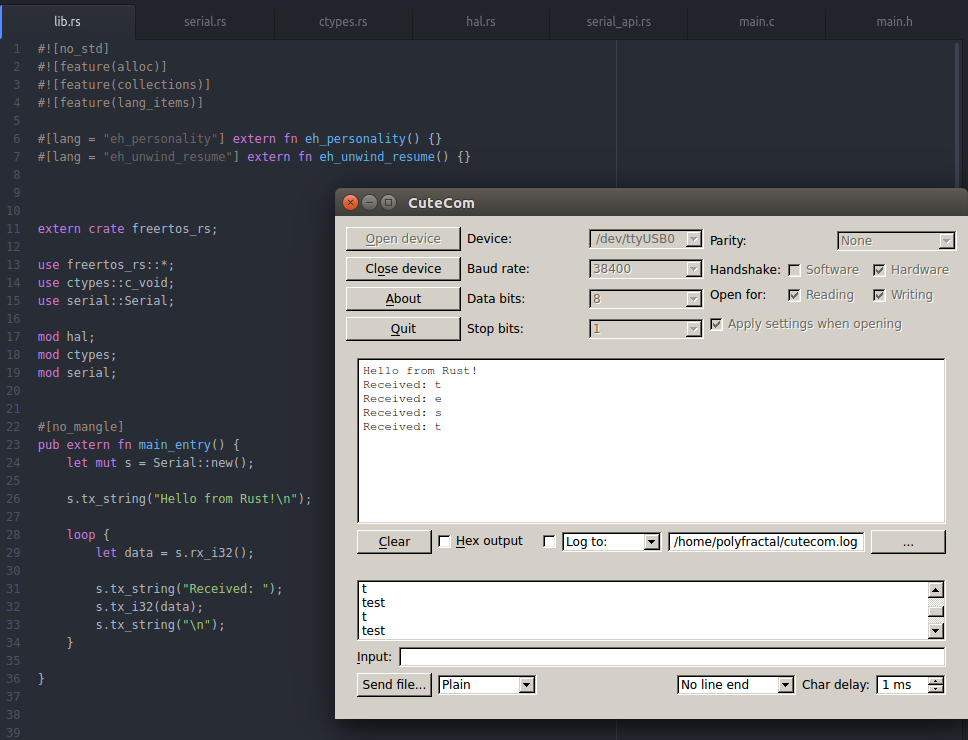
Hit “Open device” so that it's listening when we connect the RTL8710. Then put the power pin back into the RTL8710, and you should see “Hello from Rust!” show up in the serial terminal.
From that point on, it's an echo server. Type a letter, and the chip responds with
"Received: <character>" for each character you type. Neat :)
How does this all work?
So Realtek has two developer boards (one for the RTL8195 and another for the RTL8710), and an
SDK to go along with it. The RTL8710
community seems to be using this SDK, although I'm not sure how it was obtained because
the download is titled "sdk-ameba-rtl8710af-v3.5a_without_NDA_GCC_V1.0.0". Ominous, no? I guess
some versions of the SDK are under NDA? As with the Esp8266 at introduction, there isn't much
documentation or detail (and even less in english).
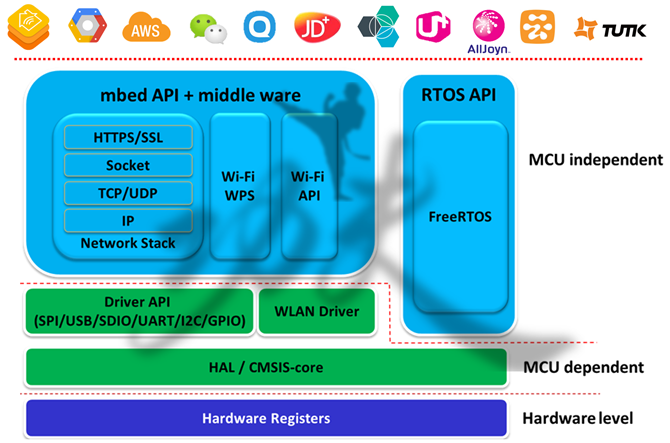
I dunno. In any case, I downloaded the SDK from Pine64, and proceeded to modify it a bit to work with the Rust build better. The RTL8710 is setup to use FreeRTOS as the OS, with mbed providing some kind of middleware/shim layer (which confuses me a bit, since I thought mbed also has it's own RTOS?).
I pruned out all the examples, and modified the build scripts to live in new locations. When you make the project, we first build the Rust portion:
TARGET=application
OBJ_DIR=$(TARGET)/Debug/rust_obj

cd src/rust && rustup override set nightly
cd src/rust && xargo build --target thumbv7m-none-eabi
mkdir -p $(OBJ_DIR)
cp src/rust/target/thumbv7m-none-eabi/debug/librustl8710.rlib $(OBJ_DIR)/librustl8710.o
As you can see, we use Xargo to cross compile to our
thumbv7m-none-eabi target (e.g. Cortex-m3). Then we copy the final build product
to application/Debug/rust_obj for linking later. But what's being compiled?
lib.rs
In src/rust/src/lib.rs,
we have a basic skeleton. There is a single exported method called main_entry(), which
is called by the C side of the house.
Inside the main function, we create a Serial struct and do some simple receiving/echoing:
#[no_mangle]
pub extern fn main_entry() {
    let mut s = Serial::new();

    s.tx_string("Hello from Rust!\n");

    loop {
        let data: i32 = s.rx_i32();

        s.tx_string("Received: ");
        s.tx_i32(data);
        s.tx_string("\n");
    }
}
The Serial struct is a wrapper around some unsafe functions which were generated via Bindgen against the mbed headers.. I was attempting to generate a wrapper for just the serial header, but to appease Bindgen I had to link in all the various headers… which ultimately generated an enormous wrapper, apparently of the a large swath of the mbed middleware. Oops.
Over time, I'll likely start pulling these out into individual submodules (e.g. serial.rs
won't call into hal.rs, but instead contain all the wrapping and rustification).
There are also a bunch of functions in lib.rs such as __exidx_start() that simply have
an empty loop{}. What are these for? What do they do? I have no idea! LLVM
complained about missing these after I added the bindgen wrapper, so presumably something
in the wrapper needs these functions which aren't available because the project is #![no_std].
A loop{} was undoubtedly the wrong solution, and I'm sure I'll need to fix it later, but
it works for now :)
main.c
On the C side of the house, it's very simple. We simply include the device HAL headers,
a freertos_rs shim (more on that in a minute), and then call the extern main_entry() function:
#include "device.h"
#include "main.h"
#include "freertos_rs.h"

void main(void)
{
    main_entry();
}
And finally, when we compile the C side, we just link in librustl8710.o.
Everything after that is basically stock compilation from the SDK.
freertos_rs
The project is setup to use freertos_rs, which is basically a shim/wrapper so that Rust can use FreeRTOS functions. Because most of FreeRTOS functionality is actually macros (I'm told… I don't know anything about FreeRTOS), freertos_rs uses a C shim to wrap the macro with a function. We can then invoke those functions via FFI.
The shim includes a few specific headers for the platform, and is added to the C build where it gets included. There were a few functions I had to comment out; the SDK ships with FreeRTOS v8.1.2 which appears to be slightly older than the one that freertos_rs targets. Upgrading FreeRTOS is on the todo list, although I have no idea how tightly coupled the mbed middleware is to this version.
Conclusion and future thoughts
So that's basically it! Rust on RTL8710, running FreeRTOS, interfacing with the C build via an mbed wrapper and freertos_rs shim. I really have no idea what I'm doing, so I fully expect this house of cards to fall apart as soon as I try more complicated things (like using collections, heap allocation, etc). But it's a good start, and hopefully this post will be helpful for others wanting to try out the RTL8710.
It's a neat little chip, and I'm excited that Rust can run on it.
Future plans include attempting GPIO and SPI control, cleaning up the mbed wrapper into discrete modules, perhaps reimplementing some of the mbed stuff with Rust directly, and attempting to call FreeRTOS directly from Rust.
It may also be interesting to see if Tock can be ported to the RTL8710, but I suspect this is slightly outside my capabilities for now. :)